Quite a few things are changing as the number of hives I'm managing increases.
The last few years I've worked glove less the majority of the time. Even when extracting honey I'd go without gloves. I'd wait until I got stung once or twice and then I'd put them on.
When not wearing gloves after getting stung the bees can smell the sting and the end result is most often more stings in exactly the same spot. Ouch!
I started by wearing light garden gloves. They fit pretty snugly so I found I could still get a good sense of feel. The bees could sting through it if they wanted to but most of the time they wouldn't. The gloves would reduce the smell of my flesh which I think helped.
When swarm collecting though I've had some painful multiple stings if a clump of brushed bees would land on my hands. And bees would get inside my shirt sleeves.
So I finally purchased a pair of "swarm gloves". They fit well and I do get a sense of feel with them which is really important for me.
I've grown to 19 hives now and so when working that can add up to a fair number of stings in a day.
When harvesting honey this year I wore the garden gloves - but even after a few stings through the gloves the bees would sting the same spot again. That's when I'd keep multiple pairs so I could change them.
When I ran out I tried the swarm gloves.. and I really like them. The sleeve part covers the openings at the cuff of my shirt and they're tight enough and not too thick to feel.
Stings can't go through the gloves which was nice. And I note that I got five stings on the gloves while working one hive and every one of those stings was not from a bee but from a yellow jacket.
I found yellow jacket stings I'd itch and swell a bit whereas with a bee sting I wouldn't react at all other than a brief moment of pain.
So, why suffer? If the bees or pesky yellow jackets are stinging, pull on the gloves.
Monday, September 30, 2013
Friday, September 27, 2013
How to add a Treatment to a Hive
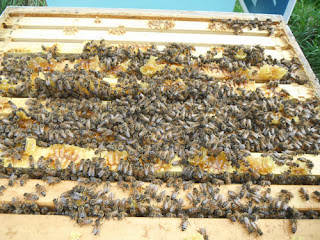
When adding a treatment to the top bars of the hive such as a Mite Wipe Pad or AFB treatment you'll notice on opening the hive that there's too many bees and too much comb to just lay it down flat.
You don't want to squish bees and with a mite wipe you don't want to poke holes in it's fragile wrapping.
Here's the beekeeper recommended way of clearing space on your top bars to add a treatment.
You don't want to squish bees and with a mite wipe you don't want to poke holes in it's fragile wrapping.
Here's the beekeeper recommended way of clearing space on your top bars to add a treatment.
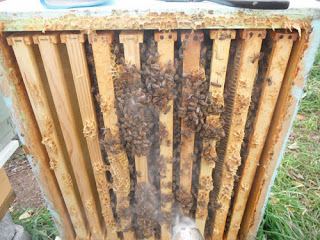
Smoke to move the bees off the top bars and push them down and out of the way so they won't get crushed.
A ton of smoke isn't needed. Pause between puffs to give them a moment to move.
Scrape the extra built-up burr comb (wax/comb/honey mix) with your hive tool.
Hold it low down, not quite flat, and slide it along the length of the bar. The combs will ride up on the hive tool.
If bees are on it they can surf on the combs.
You may find it easier to smoke an area and do it and then smoke the next area as the bees tend to come back quickly when honey is exposed.
Place the scraped off combs on the front porch for the bees to eat. Don't let them go to waste. The bees will recycle the honey back into the hive and sometimes some of the wax too.
The leftover wax can be collected later to be used for candle making.
Nothing is wasted.
Place your treatment on the cleared space on the top bars.
In this case I'm adding a single Mite Wipe.
Other treatments or product that could be laid on the bars are pollen patties, AFB powder on wax paper, sugar syrup in a plastic baggie.
The same cleaning methods are used for all these products.
In this case I'm adding a single Mite Wipe.
Other treatments or product that could be laid on the bars are pollen patties, AFB powder on wax paper, sugar syrup in a plastic baggie.
The same cleaning methods are used for all these products.
Check the super above before setting it on top. If can often be set on end so you can have a proper look/
Are there tons of bees on the bottom of the box or a large build up of comb hanging down?
Combs could puncture the wrapping on a mite wipe when the boxes are placed back together.
Smoke the bottom of the box to move the bees up inside out of the way.
Scrape if necessary, however most of the time scraping the bottom box is sufficient.
Set the box into position on the treated box and you're done.
Wednesday, September 25, 2013
Subtle Differences between Frames of Brood and Honey
After a season or two of beekeeping you'll find you don't have to always dig so deep into a hive and disturb it quite so much to know what's going on.
Most of the time I don't use queen excluders. So the queen can move up and down in the hive laying eggs. Once the honey flow is really on she tends to get pushed down into the deep as the brood area as the top supers fill up with honey.
Often in fall if I haven't yet removed supers there may be brood in the centers of the frames or a mixture of pollen and honey.
I find two noticeable differences between a honey frame and a brood/pollen frame.
First, the honey frame is much heavier than a frame with brood/pollen. So as I lift the frame up I can gauge pretty quickly by weight whether the frame has brood on it or if it's just honey.
The second thing is the amount of bees covering the frame. If there are eggs or larvae, the frame will be heavily covered in bees as they warm and tend to the brood. A honey frame will have bees on it but no where near the coverage.
Sunday, September 22, 2013
Quick Recharge of Sticky Boards
Since I started beekeeping I have used Crisco Shortening as a coating for my mite sticky boards.
I would scoop a clump of the shortening into my hand and spread it with my fingers. This process was a bit slow and not so bad when I only had 2, then 4, then 6 hives. Now that I'm bordering on 19 hives it's too time consuming.
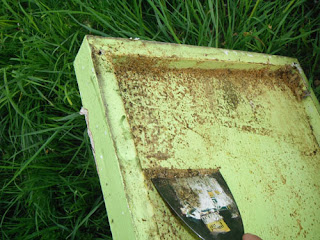
I had heard of a paint roller being used but what I've opted to use is a putty knife. I can toss a glob onto the board and then spread it nice and thin with the knife.
But the best part of all is the clean off. Previously I'd use paper towels and rub off all the build up of mites, pollen, bee parts and miscellany. Again, a time consuming process.
Now I angle the sticky board over a metal garbage pail which I keep in the yard. Then I scrape the old stuff with the putty knife straight into the garbage. No more wasting of paper towels. And it's super fast too.
The putty knife can be used to help clean off a bottom board if needed but be careful not to take the paint off too.
For the most part I find I don't really need to clean bottom boards. I leave the sticky boards in all winter, make sure the back is covered and insulated against the cold. All the debris collects on the sticky board which I then pull out in spring and scrape off.
Also don't forget to have a small tilt in your hives so that water will run off - depending on which way you have your sticky board located, front or back. Mine are at the back so I have the hive platform at the front wedged up a bit with cedar shingles.
Wednesday, September 18, 2013
Stressfree Reorienting of Hives
With bees, experience is a good teacher. One thing I've learned over the years is that I haven't set my hives in the best position based on the location of the sun.
[Photo - 4 east facing hives. Two on the left I wanted to change to south facing].
Two hives in particular were getting quite a draft from east winds in early spring. The wind would blow the poor bees left and right.
I'd come in the yard on particularly windy spring days and see bees scattered all over the grass in a large area where the wind had tossed them. If I didn't look down I would have stepped on them.
The two hives were active and large and I didn't want to take them home to shuffle their memories so I could bring them back--mostly this decision is because my home is only 4 km away and the bees do tend to fly back to the yard (and I can't help but spend extra time collecting these strays. Picture me picking them up one by one and taking them to their new home).
Because I had time on my side I opted instead to do a more stress free shift. I would leave the hives in place but instead rotate them a few inches every few days, gradually angling them until I had them turned into a southern position.
Over the first few weeks of spring that's what I did and it worked very well. The hives were side by side and I got them facing south where they'll get more light and less wind blowing straight into the entrance.
Shifting these hives wasn't as hard as I thought, given that they were heavy with honey. I'd use my hive tool to pry the bottom up and then carefully give a shove on the deep. I did notice that after a rain that the hives did slide much easier than when the platform was wet.
I didn't see any lost bees wondering around outside for very long. I only made the rotations on warmer days so that if the bees were outside for a bit trying to re-orient or figure out the change they didn't perish from the cold.
Tuesday, September 17, 2013
Bees find their own sources
You won't hear me say that I'm smarter than a bee. I know better.
I wrote a while back about getting to know your local politician.
The reason for this is so that you can ask for their used plastic signage.
These plastic sheets make great roofs on the hives.
In summer they cover the hot metal of my outer covers.
They provide rain protection on the front porch and they give shade.
In the winter they keep snow from piling up against the entrance and blocking in the bees.
And again they give protection from freezing rain and ice pellets.
Last summer I noticed that the bees were constantly hanging out on the edges of these signs. I observed them on several occasions and couldn't figure out why the signs were so appealing.
Then I noticed they had their tongues out. At first I thought the signs maybe tasted nice.
On closer observation I noticed that the corrugated interior of these signs is hollow and water collects there.
The bees didn't take long to figure this out and use it as a quick source for a drink.
So, here's one more great reason to get to know that politician. Like them or not, they do have great signs :)
Saturday, September 14, 2013
Bees Choosing an Entrance
I picked up these bees last year in a subdivision in southwest London. It was a secondary swarm - so it was smaller than a football but bigger than a softball--big enough that it was worth taking.
I call this hive Convenient because the bees were very good to swarm only 4' off the ground so it was very easy to collect them.
They been great and productive bees. I was suspicious that the swarm may have come from an attic of one of the homes in the area.
This idea held with me because I noticed something funny, or say different about these bees compared to my other hives.
They would only come and go from the upper entrance.
I watched them for the longest time and every time I went to the yard they were always coming and going up top. The bottom platform would be bare or nearly empty of bees. There would be so many bees at the top they'd be piling onto each other and falling to the platform below.
Did they like the top because it was like the entrance (possibly attic) from their old home?
I gave them an inner cover with a centre hole and then an outer cover with an exit as well--this equipment I already had on hand--and it gives them two entrances at the top.
Now here's the stranger part. The following spring these bees kept up with this habit. We all know that the bees in spring would be new bees and that last years bees would be long since dead. They would have even requeened too.
So why is this habit continuing? Are they doing it because they don't like the bottom entrance? Have they learned to go in and out that way from the older bees and so they're copying them?
More questions than answers but it's interesting to observe.
This year they are preferring the top as usual but I notice that they are guarding at the bottom and a few bees do come and go from there.
I call this hive Convenient because the bees were very good to swarm only 4' off the ground so it was very easy to collect them.
They been great and productive bees. I was suspicious that the swarm may have come from an attic of one of the homes in the area.
This idea held with me because I noticed something funny, or say different about these bees compared to my other hives.
They would only come and go from the upper entrance.
Did they like the top because it was like the entrance (possibly attic) from their old home?
I gave them an inner cover with a centre hole and then an outer cover with an exit as well--this equipment I already had on hand--and it gives them two entrances at the top.
Now here's the stranger part. The following spring these bees kept up with this habit. We all know that the bees in spring would be new bees and that last years bees would be long since dead. They would have even requeened too.
So why is this habit continuing? Are they doing it because they don't like the bottom entrance? Have they learned to go in and out that way from the older bees and so they're copying them?
More questions than answers but it's interesting to observe.
This year they are preferring the top as usual but I notice that they are guarding at the bottom and a few bees do come and go from there.
Labels:
bees only using upper entrance
Wednesday, September 11, 2013
Water for Bees
At flee markets or garage sales if I see the large dark blue enamel roasting pans with the white spots--the kind that are large enough to roast a big turkey--I always buy them.
I started using them years ago when I wanted to put a container on the ground for water for the wildlife. I found that plastic dishes would crack with our cold Canadian weather. But the enamel pans are crack proof and rust proof too.
I have about 4 of them set up on an old large wooden box. They're high enough to stop the raccoons playing in the water... but maybe not to keep birds from having a bath or a drink, but I don't mind them.
To stop the bees from drowning I grab handfuls of long grass and lay them on top of the water. The bees use these as floating logs to land on. In commercial beekeeping they put their syrup in barrels and put straw on top as a floating platform.
Sometimes the grass has roots and it will grow. Maybe it adds a special flavour to the water.
There's one plant with a small ruffled edge and a purple flower that loves sitting in the water and it grows there. Either way, the bees use this watering hole consistently.
I bring jugs of water from home and top the pans up every couple weeks and more often if it's been hot with no rain.
The most satisfying thing for me is that they have water close at hand. After all they work hard enough so why not make something easy for them.
Best of all though is that the bees do not drown in the water. The grass is very effective at giving them something to cling to.
So when you see that garage sale sign or flea market ad, you may want to drop by and check out the roasting pans.
Subscribe to:
Posts (Atom)