Tuesday, April 26, 2011

Gold, Lots and Lots of Gold.

It was a lovely sight to see when arriving at the bee yard.  Gold.  Large gold lumps on dozens of workers' legs.

Finally we had a warm sunny day with temperatures around +15 Celsius and the bees were happy to be out flying.

The flowers were blooming and offering pollen and the bees seemed to know exactly where to look for it.

The line-ups outside the hive were a pleasure to watch and photograph.  I still have my entrance reducers in place.  I'll probably be removing them next week when I do my Formic Acid treatment.

Some workers had double loads with their baskets bulging on their lower legs.

Most had packed their pollen well above their basket level.  They were waddling into the hive under the weight.  I don't think they minded at all.

All four hives were active bringing in the same yellow coloured pollen.

Hive #2 has opted this year to come and go from the top entrance.  Typical with this hive which insists on doing everything differently than the other hives.

This just goes to show that not all hives behave the same way.

At our last bee club meeting I met several new wanna-bee beekeepers.  It was very exciting to see so many at our meeting this year.

At this visit one of them, Janice, came to see our hives opened and to get some first time hands on the bees.  I'm so proud of the bees' behaviour--calm and gentle, as always and no smoke needed.

Hive #1 had not finished their second baggie/Fumigilin treatment.  They had eaten most of the AFB powder but aren't due for more until next week.

Hive #2 hadn't finished their first baggie/Fumigilin.  This is the hive that does things differently and sometimes makes me resort to prayer.  They had brown poop outside the hive in winter so I had a concern they may be battling Nosema and all winter I feared they were dead.  But they keep surprising me.

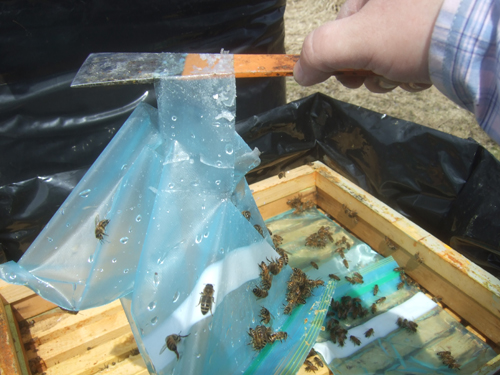
Hive #3 is very busy and they had the most workers out getting the pollen--the photos are of this hive.  They had finished their baggie/Fumigilin so we gave them their second and final baggie.  Once that's done I'll switch to the hive top feeder.  They had made good progress eating their AFB powder.

Hive #4 had finished their second baggie/Fumigilin so their treatment is done.  They still had patties and AFB powder to finish.  I removed one rim spacer so they had less room (hives 3 and 4 are very keen to build comb if there's extra space).  Then I added the hive top feeder with syrup.

Wraps are also still on all hives.  I'll look at taking them off in the next week or two when temperatures are more stable and not so cold at night. 

Saturday, April 23, 2011

Sister Bee

I had an amazing experience with a worker bee.

There were a few bees outside the hive, stiff and unmoving from the cold.  I'd just warmed up a batch, taking photos and video (which are included here but those are the only photos I took).

Then I went to Hive #2 where there were many bees standing in a frozen stupor on the cement bricks that support the platform.
I'd finished the work on the hives so I picked them up.  These encounters provide an interesting time for me to observe bees close up.  There were about ten of them, along with a drone.  I held them cupped in my palms.

One worker stood out in memory because I could see her problem.  I found her on the ground.  In fact, I'd nearly stepped on her.  She had a clump of pollen pattie stuck to her wing.  The weight would be a problem and it would prevent her wings from locking together properly so she could fly.  It would surely cause her death.

I cupped the bees in my hand, leaving a small portal open  between my thumbs.  Several were moving slightly when I picked them up.  They warmed up very quickly and popped out of the portal between my thumbs like bees leaving a hive, one after the other after the other.

The rest were colder and needed more time to warm up.  I could feel them crawling around in my cupped hands.

Each one flew off, the drone was first followed by the other workers.  The worker with the pattie on her wing flew too, or at least tried to.  But she couldn't fly and she ended up on the ground again.

I picked her up and took her to the truck.  I had a tiny metal tool I could use the scrape the wing.  Gently I rubbed the wing while she sat on my hand.  She let me lift her wings so I had better access, but no luck.  I could see the pattie was stuck underneath her secondary wing.  It was stuck to her like peanut butter.

I  put her in a queen cage and took her home.  She needed her wing cleaned off and I had an idea.

At home she was hungry.  I gave her honey and while she licked at it I used dampened Q-tips to lift and rub her wing.  She sat on my hand and I knew she might sting me, but I decided to chance it.

I was astounded when she actually lifted and separated her wings.  She held them up so that I could swab at them over and over.  I'm sure she knew I was trying to clean her, like a sister bee.  I dribbled water on her and then used the Q-tip to rub.  Then I used it dry her off.  She never tried to run away and didn't show any sign of aggression.

The dampened Q-tips worked.  Her wing was clean.  I realized I'd better act fast because she could fly.  And she did.  The cats heard the loud buzzing and they tried to race ahead of me to catch her.

She landed on the window and I lowered my honey covered finger.  She latched on, no problem, her long tongue coming out.

I took her outside and stood in a sunny spot in the back yard.  She ate honey for a bit and then she walked across my palm and lifted up in flight.

She circled me about five times, making orientation loops and then she was gone--headed in an eastern direction--for home.

The bee yard is about 4 km from my home so she I knew she'd make it.

I don't think I'll ever stop loving learning from the bees.  I wonder what they'll teach me next?

Thursday, April 21, 2011

2011 Treatment Recommendations from Ontario Ministry of Agriculture

The Ontario Ministry of Agriculture have released their:  2011 Treatment Recommendations for Honey Bee Disease and Mite Control

(This is an Adobe .pdf document on the Ontario Bee Association's website.

And now, an update on my hives for the record.

I returned to give them their second round of Fumigilin in sugar water but only Hive #1 and Hive #4 had finished theirs.  I believe two things are the cause - temperatures have been cool and taste--if the bees could eat regular syrup they certainly prefer it.

I gave all hives their Oxysol AFB preventative treatment - mixed with sugar powder and laid out on wax paper.

It was +6 Celsius today and the hives were active except for Hive #2.

Again Hive #2 is slow to consume their patties and syrup.  This is their typical behaviour.

The two 'nuc' hives (#3 and #4) from last year we're doing very well and were very active.

Although they were active I didn't see any pollen coming in.  I credit that to our cool temps and lots of rain the last few days.

Hive #4 had finished all their feed/patties and I topped them up.  I did not give them plain syrup, only treated, so that's all they have to choose from.

Hive #3 had lots of bees at the top of the hive and they'd built comb attached to the inner cover.  They hadn't finished all their baggies.

I'll check again on them again in three days.  Temperatures should be warming up a bit over the next week.

I'm holding off on my Formic Acid treatment for Varroa for another week.  I want temps to be more consistently above 10 degrees so it'll be more effective.

Wednesday, April 20, 2011

Spring Treament: Oxysol for American Foul Brood (AFB)

When reading the history of bees in North America they say the Pilgrims brought hives with them across the Atlantic Ocean to North America.

And they brought a bee disease too--American Foul Brood.

The Oxysol treatment, mixed into powdered sugar helps prevent an AFB infection from taking over the hive.

This treatment is 4 grams of Oxysol which is mixed into 32 grams of powdered sugar.

The hive is to be given 32 grams of this powdered mix once a week for four weeks.
The instructions mention sprinkling it on the bars, but a better way is to lay a square of wax paper on the frames and put the powder on that.

[Confectioner's sugar is regular white sugar but it's very finely ground so it dissolves very quickly.  Baker's often use it as a decorative sprinkle on fruits or for a quick dissolving sugar for drinks].

The reason for the 32 grams of sugar is to be sure the bees take in the treatment at a certain rate.

From reading the last two posts you can probably guess that having a small scales is a handy piece of equipment to have around.  Dad got our scales for under $10.00.

Here is a quote from the Ontario Ministry of Agriculture on spring/fall treatments with Oxysol:

OXYTET-25-S or OXYSOL-62.5 powdered sugar mix. Follow the label directions for preparation of material. Label must indicate that
the mixture can be used for honey bees. Treat according to the label on OXYTET-25-S or OXYSOL-62.5 with the powdered sugar mix along the margins of the brood chamber. Be careful not to put powdered mix directly on to open brood. Repeat 3 times at 4-5 day intervals in the spring and
in the fall. Stop treating 4 weeks before the main honey flow.

PREVENTATIVE MEASURE:
All bee colonies should be treated.
It is not recommended to use the sugar syrup method of application or products such as pollen substitutes as carriers, as this can contaminate honey, is less effective and will promote resistant AFB strains.

Sunday, April 17, 2011

Spring Treatment: Fumigilin B

Fumigilin B is one of three spring treatments I do for my hives.

The Spring Feeding directions say to feed 5 grams of Fumigilin in 4 Litres of sugar syrup.

The idea is that you want the bees to eat the syrup within 24 hours after mixing it, while the medication is still suspended in the syrup instead of settled to the bottom.

I'd been waiting on the weather until temperatures were in the pluses.  Most days have been anywehre from +5 to +15.

I did some measuring.  A typical plastic juice pitcher is 2 Litres when filled to the bottom of the spout (not all the way to the top of the jug).   I used a small scales to measure out the grams of Fumigilin powder.

Next I shook up the powder in a small contrainer of syrup.  Then I added the syrup to the pitcher and gave it a really good stir.

My plan was to use sugar baggies laid on top of the frames where it'd be close and warmed by the cluster of bees.
The large bags hold over 3L of fluid but I'd been finding when filled too full they'd leak and drip once slit.

I planned instead to do the treatment in 2 feedings.  So they'd get 2L syrup and 2.5 grams of Fumigilin.
[Here's 2L of syrup in a large Glad freezer bag.]
I'll return in a couple days to remove it and give them another 2L syrup.

The bees have been very interested in the pollen patties, even more than the syrup,I think it might be because it's not cold like syrup.

It's probably like fast food--ready made bee bread that they can feed the larvae.

The challenge over the next few days will be finding a day when the weather permits opening the hive.  We're looking at rain the next few days.

Tuesday, April 12, 2011

The Future of Sugar

Last week on the tv program Doctor Oz, they were discussing a recent accidental discovery about  Alzheimer's disease.  A doctor was doing an experiment and discovered that nitrites trigger Alzheimer's.

The brain produces insulin and these nitrites play havoc with the brain.  Nitrites are found in most processed foods (bacon and deli meats, processed cheese, some beer, white sugar, flour and rice).

Because of the effect of nitrites interfering with the brain's insulin and the nerves of the brain the doctor now describes Alzheimer's as diabetes of the brain. 

When the foods we eat are examined many cause our bodies to produce these nitrites and white sugar is one of them.

[Follow this link to Watch the Dr. Oz program to see the whole program.]

Sugar is also well known to cause glucose levels to spike and then suddenly drop so it's not a good energy booster.  Honey is a far better choice and doesn't cause sugar levels to drop so suddenly.

Every time sugar comes up the news isn't good.  The only good thing that could be said about sugar is that its cheaper than honey... but look at the negative payoff!

Historically, honey was the main sweetener used for hundreds of years.  Then after North America and European countries discovered cane sugar everything changed.  Sugar quickly overtook honey as a cheap sweetener.

[Photo - our bee club having a friendly honey competition].

Honey comes in so many glorious flavours and colours.  It is certainly time for a huge comeback.

Move over sugar, honey's coming.

Saturday, April 9, 2011

Beekeeping Suppliers in Ontario

I have to say when I first started to meet beekeepers I was surprised to discover how willing they are to help.

Get us together in a room and the conversation will go on and on and on. There's a shared passion about bees that just gets us buzzing.

Another great thing about beekeepers are great beekeeping suppliers.

We have a lot of really good ones in both Canada and the USA. Some have been in business for generations. Below are links to lists of beekeeping suppliers in Ontario. (Why recreate the list since it's already on the web?)http://www.omafra.gov.on.ca/english/food/inspection/bees/info_suppliers.htm

http://www.ontariobee.com/index.php?action=display&cat=14

USA Suppliers: Two well known companies are Maxantindustries.com and Dadant.com. Both are well respected and have been in business for years. Dadant has an on-line catalogue. They ship to Canada too.

Wednesday, April 6, 2011

It's Not Rocket Science. It's a Rim Spacer

I'm not so sure... this might be rocket science after all because it is hard to get it just right.

I have a few rim spacers in two sizes. What I notice is that if the sugar baggie is very full I need to stack two spacers together to allow enough room for the baggie and the bees on top.


But give them too much space and they find it irresistible. They must build comb!

This just might be a new version of the Goldilocks fairy tale... trying to get it just right.


I mentioned in my last blog how my first year I got to the bee yard with my baggies and spacers. I set the them down on top of the hive and discovered that the rim spacer wasn't tall enough.


Oops. The choices were to either let some syrup out or use a second spacer.


If you're new to beekeeping it never hurts to check things out at home first before you go "live" at the hive. I laid my baggies on the counter and tested with my spacers, discovering I needed two small spacers stacked instead of one medium one.


As things ramp up in spring and it gets warmer be prepared to see lots of bees on your inner cover or on the bottom of your hive feeder. And they'll probably want to build some comb.


[Pictured at left are thousands of bees that have collected and built comb under my hive top feeder while a rim spacer is on the hive. Why both? The rim spacer is used to give some space for treatments such as Formic Acid pads but in this case the spacer was too big and the bees were naughty.]


Originally rim spacers weren't used in beekeeping and you'll see many of the diagrams in books that show the parts of the hive but they don't show the rim spacer or the screened bottom board--both newer inventions that have been created to help deal with pests and hive treatments.


[Pictured - an inner cover with centre hole].


Rim spacers are also very handy to set things down on when you don't want things set down on a flat surface. Using the outer cover is the best choice and is great to set the hive parts on because they provide enough depth that bees don't get crushed.


One thing we learned when picking up either honey supers or feeders is to check underneath before setting them down. Sometimes there are tons of bees collected on the bottom that can get crushed.

Every few days this spring as I open the hives to check baggies I'm seeing more and more activity on the top bars. The bees are gathering there to eat and they are clustering and measuring with their bodies--they're getting into comb building mode.

Sunday, April 3, 2011

Sing: Sugar Sugar... Baggies

Sugar Baggies. When they work, they're amazing. But when they don't they're a pain in the butt.

Here's some tips and tricks (not all my own invention) that I've learned along the way.

* Use only the blue freezer baggies. The plastic is thicker and more durable. The clear baggies can get rips and holes while handling or carting out to the yard.

* Use the extra wide seal bags for a more secure closure.

* Avoid sealing and resealing the baggies. I found that syrup works it's way into the seal and stops it from being tight and then these bags would leak later, usually in the corners.

* After filling, close 3/4 across and them push the air out and pinch the last 1/4 closed. Lay flat and repress the entire seal--be sure! (Once I picked up a sealed baggie. I was going to put it right on the frames but I set it down, laying it flat--the entire thing came unsealed and all the syrup ran out. Now I always lay them flat for a minute before putting on the hive.

* A large 3.79 litre and two medium 946 ml baggie will fit on a 10 frame hive leaving a little room for some patties. This means not having to go back to the yard quite so soon.

* Our Ontario Tech Team reports that an XL 4L baggie works well. I haven't found those at the grocery store yet.

* Go easy on the slits, two or three slits that are 3" to 4" long. The longer the slits the more the chance of a drip or stream of syrup on the edges of the baggie where it curves down.

* Don't overfill otherwise they'll just leak once slit. The bags curve and aren't completely flat when filled.

* Is the baggie empty but covered in bees? Instead of shaking the baggie over the hive to dislodge them, hold the baggie up and tap your hive tool hard on the plastic seal. This knocks the bees off very nicely.

* Is the baggie almost empty? If you pick up one or the other ends, it'll spill in the hive. Believe it or not you can pick up a baggie, even a full one, by sliding your hive tool through the slits in the baggie. Lift it straight up and away from the hive.

* One beekeeping friend is economical and he refills his. He holds the baggie by the tool (as described above--and pours fresh syrup into it and places it in the hive. He's pretty brave. I confess I did this once and it did work.

* Always have extra unused baggies on hand at bee yard. When one bag suddenly leaked or another got a hole I was able to quickly pour the syrup into another baggie.

* Place the sealed edge of the baggie towards the outside edges of the hive. Just a precaution in case it leaks.

* Make sure your rim spacer(s) are tall enough to leave a bee space on top of the baggie once the inner cover is in place. Test them at home before you leave. Once at the yard after placing the baggie and spacer on the hive I discovered there wasn't enough room. I had to remove the baggie and pour some out.

* Are there bees on the frames in the way and you want to set the baggie down? You can smoke them to move. For the remaining bees, instead of crushing them I set the bottom end of the baggie down and then slowly lower the baggie until it just touches the bees and then raise it slightly. This lets the bees know somethings coming and they need to shift out of the way.

* As soon as you remove the old baggie, put the new one in place before the bees walk into that blank space, causing you to have to smoke them out of the way.

* Set the baggie next to the cluster. This year I put the patties over the cluster and put the baggies close to but not completely on top of them. I did this because syrup dripping on bees in early spring can kill them (I started feeding in mid March).

* And finally, don't be an absentminded beekeeper, remember to slit your baggies before you close the hive.